Graph Editor Help
Senode is a graphical step sequencer that is based on finite state machines. The sequences are drawn as a graph with four main elements:
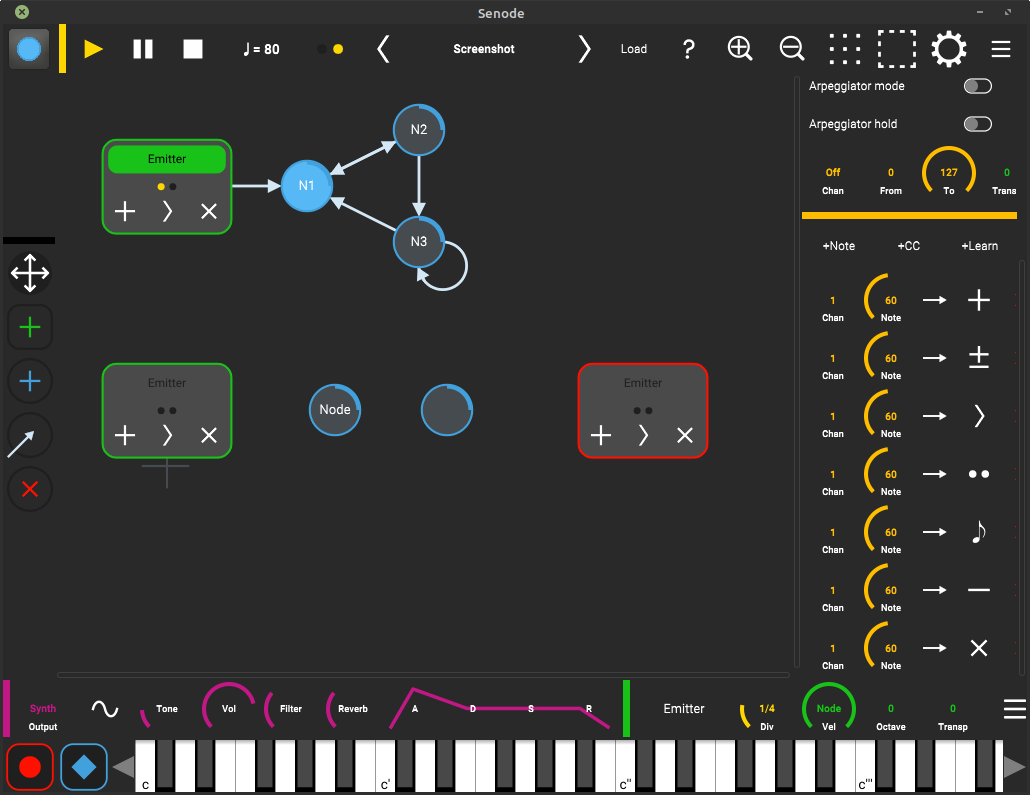
- Nodes are states that produce output. Whenever a node is activated, MIDI messages are generated, for example single notes or chords. Similar to musical notes on sheet of paper, nodes contain pitch information and have a duration which is controlled by the number of clock ticks.
- Tokens are sent on the graph and produce output as soon as they enter or leave a node. The movement of tokens can be controlled by the ticks of a main clock or MIDI bindings. Using multiple tokens, a graph can play several voices or instruments at the same time.
- Edges connect the nodes, so that the tokens can travel between them. Each edge has a single direction. Depending on the transition mode, an outgoing edge is selected by random choice or user control.
- Emitters are nodes that produce tokens. Tokens will be sent through an active outlet to a connected node. Similar to musical instruments or audio tracks, emitters control either an internal synthesizer or send out MIDI messages to other apps, MIDI devices or other emitters.
Edit Modes
The graph editor works similar to a graphics program.
You can use the following tools to create and modify your graph:
Moving Nodes
- Select the move tool
- Drag nodes with your fingers
- Double tap and drag the canvas to lasso-select multiple nodes
Adding Emitters
- Select the emitter tool
- Tap the canvas to create a new emitter
- You can also directly drag new emitters from the toolbar
Adding Nodes
- Select the node tool
- Tap the canvas to create a new node
- You can also directly drag new nodes from the toolbar
Connecting Nodes
- Select the connect tool
- Drag a new edge from one node to another
- To delete an edge, drag the same connection again
Deleting Nodes
- Select the nodes you want to delete
- Tap delete
Keyboard Input
You can use the on-screen keyboard to enter notes into the graph interactively. If you want to use a MIDI device for notes input, make sure it is selected in the settings screen as Device – In and the MIDI input channel is set correctly.
Recording Notes
- Hold down notes on the keyboard
- Pressing record will record these notes
- if a node is selected, its notes will be replaced, otherwise a new node will be created
- in connect mode a new node will be connected to the selected one
Editing Notes
- Select the node you want to edit
- Hold down edit/latch
- Now you can toggle notes on and off from the keyboard
- Press edit/latch again to leave the edit mode
Parameter Help
Clock
The yellow main clock sends ticks for synchronization.
It generates 4 ticks per beat and will sync all actions to this 16th grid.
The clock can also be sychronized to Ableton Link, if you activate it it the Link menu.
Play
- Press clock start to play
- Tokens of all active emitters will restart
Pause
- Press clock pause to pause or resume
- All tokens are left untouched and may sustain until playback is resumed
Stop
- Press clock stop to stop
- All tokens of all emitters will be cleared
- When pressing a second time, Emitter states will be reset
Tempo
- drag the tempo between 40 and 240 beats per minute The clock will generate 16th ticks
Tap Tempo
- tap the metronome to set the tempo manually
Emitter
Emitters control the tokens that they send through the outlets onto the graph. Emitters are controlled by actions, which can be triggered from the main clock, the on-screen buttons, scenes, nodes or using MIDI bindings.
Emitter Actions
Emit
- send a new token to the graph
- the token is queued until the next tick or step action is called
Toggle
- if the emitter is inactive, send a new token to the graph
- otherwise removes all token from the graph
Restart
- send a new token to the graph
- if the emitter was already active, the existing tokens are removed
Step
- advances all the emitter's tokens by one edge and trigger the nodes
- if there exists no token from this emitter, emit one
- node ticks are ignored
Tick
- send a single tick to each token
- if node tick number is reached, advance tokens by one edge and trigger the nodes
Trigger
- trigger the actions of all nodes which have a token on them
Purge
- remove a single token from the graph
- the token is retained until the next tick or step action is called
Clear
- clears all tokens from this emitter
Emitter Parameters
The following parameters are available in the property panel on the right (press the burger menu button when the emitter is selected) or the toolbar on the bottom right.
- Name – the name displayed for the emitter.
- Output channel – MIDI channel to send notes. Select Synth to use the internal synthesizer. MIDI devices can be enabled in the settings popup.
- Program change – MIDI program change message that should be sent when the patch is loaded.
- Receive clock ticks – when enabled, the emitter receives ticks from the main clock. Otherwise it needs to be clocked with MIDI bindings.
- Monophonic mode – when enabled, the emitter will allow one token at maximum. When a new token is added, the existing one is replaced.
- Div * – clock divider to handle the number of ticks that the emitter uses for each step, e.g. select 1/4 (default) for quarter notes.
- Outlet * – select the outlet that the emitter should use to emit new tokens.
- Vel * – overrides velocity for all notes. Select "Node" to use node's individual velocitites. Select "Input" to retain the velocity from MIDI bindings.
- Octave * – transpose generated MIDI notes up or down full octaves. Select 0 for no transposition.
- Transp * – transpose generated MIDI notes up or down. Select 0 for no transposition.
* parameters are affected by scenes (see below)
Emitter MIDI Input Control
Emitters are can be controlled by incoming MIDI events and emitter-to-emitter connections. There are four modes available:
- Play – incoming note on/off events are forwarded to produce sound from the emitter.
- Trans(pose) – incoming note on events are used to transpose the emitter. The emitter needs to be active to produce any sound.
- Arp(eggiator) – incoming note on events are used to activate and transpose the emitter. Not off events will stop the emitter. You can play your sequence like an arpeggiator, even with polyphony.
- Hold – similar to Arpeggiator mode, but the emitter will keep playing until it is stopped or it receives a sustain pedal off message.
The following parameters are used for input control:
- Chan – the MIDI input channel used to control this emitter. Set to Off if no MIDI input should be used.
- Low – the lowest note that should be recognized for control. Use this to configure keyboard splits.
- High – the highest note the should be recognized for control.
- Root – the note used as transpose value 0. Set this to your root note of the sequence.
- Oct – can be used to shift the input up or down by octaves.
Emitter MIDI Bindings
In addition, you can trigger emitter actions from MIDI bindings and nodes on the graph:
- select +Note or +CC in the emitter properties to add a MIDI binding, and select the respective action to trigger.
- select +Learn and the app will wait for a MIDI event to use for the binding.
- select +Trig in the node properties to add an emitter action to trigger when a token enters the node. This action will trigger the destination emitter in case of an emitter-to-emitter connection.
Node
Nodes hold the actions that are sent out to synthesizers, MIDI devices and other emitters.
Node Parameters
The following parameters are available in the property panel on the right (press the burger menu button when the node is selected) or the toolbar on the bottom right.
- Name – name displayed for this node. Will use contained notes if empty.
- Actions – the list of actions attached to this node. Use +Note to add a MIDI note or +Trig to add a trigger action.
- Ticks – number of ticks until the graph steps. Use this for individual note durations.
- Vel – velocity for generated notes. Might be overridden from emitter.
- Len – length of the generated notes. Select "legato" (default) to keep the note until the token leaves the node. Otherwise select a value between 1 (10ms) and 127 (1s).
Outgoing Edge Modes
Nodes can be configured to use different modes for deciding how to transition the tokens:
- Probability – a random edge will be picked as next destination. Use the prob sliders to set a low (0.1) or high (1.0) probability for choosing the edge. When configured to 0.0 the edge will never be used.
- Repeat – Tokens will flow in a repeating pattern (round robin). Set the number of repeats for each edge to configre the pattern.
At the moment, none of these parameters is affected by scenes (see below).
Scenes
On the bottom of the graph you can find the scene panel, which holds buttons to select multiples scenes (S1-16). A scene is a set of settings that can be recalled to create song structures or variations. The initial settings are always stored in S1 and subsequent scenes will use the same settings as previous scenes unless they get overriden.
- Triggers – use the +Trig button to activate the scene trigger mode. Now you can select actions on all emitters that should be triggered when the scene is activated. Deactivate the trigger mode after actions have been set. Tip: use S1 to trigger Restart to make an emitter active on startup.
- Parameters – the emitter's base parameters (Div, Outlet, Vel, Octave, Transp) are remembered per scene. Change the scene and update the parameter to initialize a change. At the moment, node parameters are not affected.
Synthesizer
Synthesizers are internal tone generators attached to each emitter, enabling you to create self-contained patches quickly. Synthesizers are not available in the AUv3 plugin. You can control the following parameters:
- Wave – waveform for oscillator. Select sine, saw, square or noise.
- Tone – volume of sub oscillator. This will add overtones to sine and noise, and more "body" to saw and square.
- Vol – volume of the synth
- Filter – lowpass filter (1-pole)
- Reverb – amount of reverb
- A – attack of amp envelope
- D – decay of amp envelope
- S – sustain of amp envelope
- R – release of amp envelope
MIDI Implementation
MIDI Control Bindings
When activated, Senode will listen to all MIDI IN devices on the selected channel for control messages. These can be used to play the on-screen keyboard, control the synthesizer and clock. Furthermore, each emitter can be assigned MIDI bindings that will trigger actions.
| Type | Message Chan # | Control # | Parameter | Transmitted | Recognized |
| Note On/Off | (emitter chan) | Note On/Off Emitter Output | X | O | |
| Note On/Off | (key chan) | Note On/Off Keyboard Input | O | X | |
| CC | (key chan) | 64 | Sustain Pedal (0/64) | O | X |
| CC | (key chan) | 123 | All notes off | O | X |
| Note On | 1–16 | Emitter Action Note Bindings | O | X | |
| CC | 1–16 | 0–127 | Emitter Action CC Bindings | O | X |
| PC | (key chan) | Program Change (0–127) | O | X* | |
| CC | (key chan) | 96 | Load next patch (0/64) | O | X* |
| CC | (key chan) | 97 | Load previous patch (0/64) | O | X* |
| CC | (key chan) | 70 | Selected Synth Wave (0–127) | O | X* |
| CC | (key chan) | 71 | Selected Synth Tone (0–127) | O | X* |
| CC | (key chan) | 7 | Selected Synth Volume (0–127) | O | X* |
| CC | (key chan) | 74 | Selected Synth Filter (0–127) | O | X* |
| CC | (key chan) | 91 | Selected Synth Reverb (0–127) | O | X* |
| CC | (key chan) | 73 | Selected Synth Attack (0–127) | O | X* |
| CC | (key chan) | 76 | Selected Synth Decay (0–127) | O | X* |
| CC | (key chan) | 77 | Selected Synth Sustain (0–127) | O | X* |
| CC | (key chan) | 72 | Selected Synth Release (0–127) | O | X* |
| CC | (key chan) | 80 | Main Clock Play (0/64) | O | X* |
| CC | (key chan) | 81 | Main Clock Pause (0/64) | O | X* |
| CC | (key chan) | 82 | Main Clock Stop (0/64) | O | X* |
| CC | (key chan) | 83 | Main Clock Toggle (Start/Stop) (0/64) | O | X* |
| CC | (key chan) | 86 | Next Patch (0/64) | O | X* |
| CC | (key chan) | 87 | Previous Patch (0/64) | O | X* |
| CC | (key chan) | 88 | Next Scene (0/64) | O | X* |
| CC | (key chan) | 89 | Previous Scene (0/64) | O | X* |
| CC | (key chan) | 90 | Set Scene (1-16) | O | X* |
| CC | (key chan) | 102 | Edit/latch (0/64) | O | X* |
| CC | (key chan) | 103 | Record (0/64) | O | X* |
©2014–2026 senode.org | support | impressum | datenschutz